Car Seat Safety Starts with Proper Installation
It is a question that most new parents find themselves wondering about, how to install a car seat. You will likely be faced with car seat installation when preparing to take your child home from the hospital.
All throughout your little one’s childhood, you will need to know how to safely install their car seat. In this article, we will cover the various types of installation and procedures for each type of car seat.
Read on to find out all there is to know about proper car seat installation.
How to Install A Car Seat: Installation Basics
Before Installation
Before installing your car seat, be sure to read your exact car manual and car seat manual. Every vehicle is different. Older models may not have new installation features, like LATCH. Therefore, you may need to use the vehicle’s seat belts.
It is helpful to know how your specific vehicle works with car seats before attempting to install one.

Just like every car is different, so are the various models of car seats. Your car seat manual is the best source of installation information. It can be very helpful to read through your manual entirely before you try to install the seat.
The manual will often have various methods of installation, so you can find the most appropriate one for your vehicle. Additionally, the manual should provide guidance about how to install the seat based on your child’s age, such as which direction it should face, proper recline, and how to make sure it is level.
Many convertible car seats have adjustable reclines. The angle of the seat depends on your child’s age, height, and weight. You will want to adjust the angle of your car seat before installing it in the car. Reading the manual beforehand will tell you the proper angle so you can make the adjustments.
It is often easier to figure out these things before you get the seat in the vehicle. It would be a shame for you to install it only to find out it must be rear-facing or isn’t properly reclined. Your manual will be your go-to guide every time you need to install and uninstall your car seat.
LATCH vs Seat Belt
What is LATCH?
It is important to decide what installation method you want to use before installing your car seat. Some vehicles are equipped with Lower Anchor Tethers for Children or commonly known as LATCH. Almost all vehicles manufactured after September 2002 are equipped with LATCH.
Wondering does my car have latch system? It is easy to check.
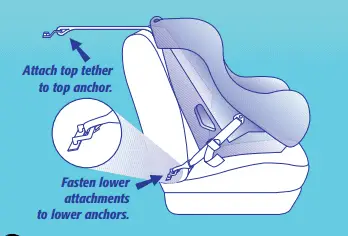
LATCH is essentially anchors and straps. The lower anchors are positioned between the seat cushions in your car’s back seat and a top tether anchor is located behind the rear seat. The lower anchor straps are on the base of the car seat while the top tether strap is on the top back portion of the car seat.
Not all car seats use the tether anchor and strap. The tether anchor and strap are primarily for forward-facing car seats. The LATCH anchors are commonly rated for use with up to 65 pounds.
The LATCH anchors will always be in the middle or back seat of your car, depending on your vehicle size and type. Experts recommend that the safest place for your child is the center of the backseat.
However, sometimes LATCH anchors are only set up for placing a car seat on either side of the seat and not the center.
While some cars may allow you to use a lower LATCH anchor from each side to install the car seat in the middle cushion, this isn’t always possible. You should follow your vehicle’s manufacturer’s instructions and place your car seat wherever you can achieve the tightest installation.
The National Highway Traffic Safety Administration has more information on LATCH here.
What is the Seatbelt Method?
If your car does not have LATCH, or you want to know how to install a car seat without latch system, you can install the car seat with your vehicle’s seat belt system. All car seats, be it from Graco, Chicco, Evenflo, Britax, Peg Perego, Maxi-Cosi and more, have a belt path route which you can use to install your child’s car seat.
Because LATCH anchors may not be positioned for installing your car seat in the middle of your back seat, you may want to use the seatbelt method. It is important that you prepare your seat belt for car seat installation before you use it to secure your seat.
The seat belt should be switched to the locked position. This means that the seat belt will remain locked when you secure the seat and tighten the belt. Your car’s owner’s manual should have instructions that pertain to your exact vehicle on how to lock the seat belt.
When using the seat belt, you can also use the top tether anchor, but not the lower anchors. The top tether anchor can help provide enhanced safety for your child’s head and spine in the case of an accident. Note, the top tether anchor cannot be used with rear-facing car seats.
Both the LATCH system and the seatbelt system are considered equal when it comes to safety. However, you should never use both systems at once. Only use either the LATCH system or the seat belt system.
Many parents prefer one method over the other. The seat belt system is pretty easy to use but some parents feel they can achieve a more secure install by using LATCH. The method you choose is based on your vehicle type, your car seat installation instructions, and your personal preference travelling with your child.
How to Install A Car Seat?
Once you have decided on your installation method, and read your car seat manual to find the proper alignment and positioning for your child, you are ready to install. Below are guidelines, please read your specific car seat manual for detailed installation instructions.
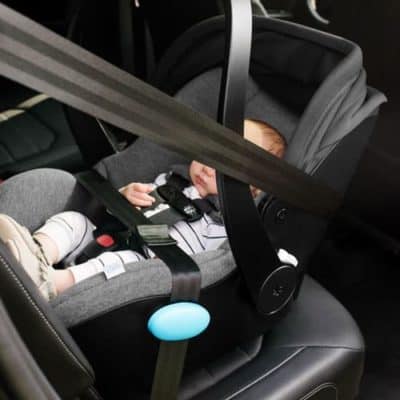
How do you install a rear-facing car seat? (or baby car seat installation)
A rear facing car seat is often an infant seat. However, convertible car seats may be installed rear facing as well.
Experts recommend that children ride rear facing until they exceed the seats height and weight limit. Oftentimes, until they are at least two years old. Rear-facing installation is the safest position for young children.
Steps:
- Place your properly reclined car seat in the back seat (the center position is preferred)
- If you are using a convertible car seat you will place the entire seat in the car
- If you are using an infant car seat you will only be installing the base
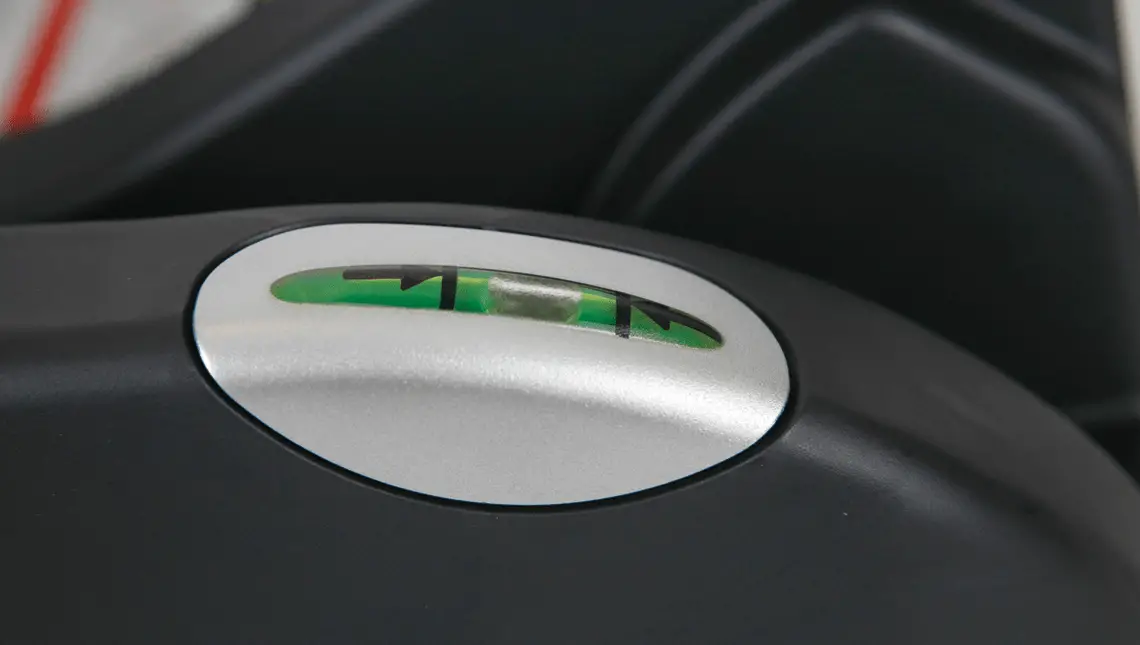
- Check that the car seat is at the proper recline level by using the seat’s bubble level indicator
- If your car seat manufacturer’s instructions recommend the use of a rolled towel to achieve the proper recline, you may place it now
- Secure your car seat using the seat belt or LATCH system
How to install rear-facing car seat with seatbelt
Steps:
- Pull your car’s seat belt all the way out and switch it to the locked position
- Route it through your car seats designated belt path ensuring it is not twisted
- Secure the seat belt
- Remove all slack from the belt and tighten it, pressing down firmly on the base while you pull the belt tighter
- Recheck the bubble level recline indicator
- Check for tightness by wiggling the seat back and forth, ensure it doesn’t move more than an inch in either direction
- If you are using an infant car seat you can now attach it to the base, make sure you hear an audible click and that it is securely attached
How to install rear-facing car seat with LATCH
Steps:
- Loosen the lower anchor straps
- Attach each strap to the lower anchors ensuring they are not twisted
- Tighten the anchor straps by pressing down firmly on the base while you pull the straps tighter
- Recheck the bubble level recline indicator
- Check for tightness by wiggling the seat back and forth, ensure it doesn’t move more than an inch in either direction
- If you are using an infant car seat you can now attach it to the base, make sure you hear an audible click and that it is securely attached
How to install a car seat forward-facing (or convertible car seat installation)
There are a handful of seats that can be forward-facing. Convertible car seats, combination car seats, and all-in-one car seats are seats that transition from one position to another.
Convertible car seats and all-in-one car seats transition from rear-facing to forward-facing and sometimes to booster mode, making them value for money car seats that grow with the family from newborn to toddlerhood. Combination car seats transition from forward-facing to booster. All forward-facing car seats are installed in relatively the same manner.
If your child is ready to transition to a forward-facing seat (they have exceeded their previous seats height and weight limits for rear-facing) then read on for installation.
Steps:
- Place your car seat in the back seat of your vehicle, forward-facing
- Check that the car seat is at the proper recline level by using the seat’s bubble level indicator
- If your car seat manufacturer’s instructions recommend the use of a rolled towel to achieve the proper recline, you may place it now
- Secure your car seat using the seat belt or LATCH system
For seat belt installation of a forward-facing seat
Steps:
- Pull the seat belt all the way out and switch it to the locked position
- Thread the seat belt through the guided belt path on your seat ensuring that it is not twisted
- Buckle the seat belt
- Remove all slack from the seat belt and tighten it by pressing down firmly on the car seat as you pull the belt tighter
- Attach the top tether strap to the top tether anchor ensuring the strap is not twisted
- Tighten the tether strap securely
- Check for movement by wiggling your car seat side to side, ensure it doesn’t move more than an inch in either direction
For LATCH installation of a forward-facing seat
Steps:
- Loosen the lower anchor straps
- Attach each strap to the lower anchors ensuring they are not twisted
- Tighten the anchor straps by pressing down firmly on the seat while you pull the straps tighter
- Attach the top tether strap to the anchor ensuring it is not twisted
- Securely tighten the strap by pulling it as you press on the seat
- Recheck the bubble level recline indicator
- Check for tightness by wiggling the seat back and forth, ensure it doesn’t move more than an inch in either direction
To recap, here’s a simple video by Howcast that demonstrates how to put a car seat in a car using LATCH with some extra installation tips:
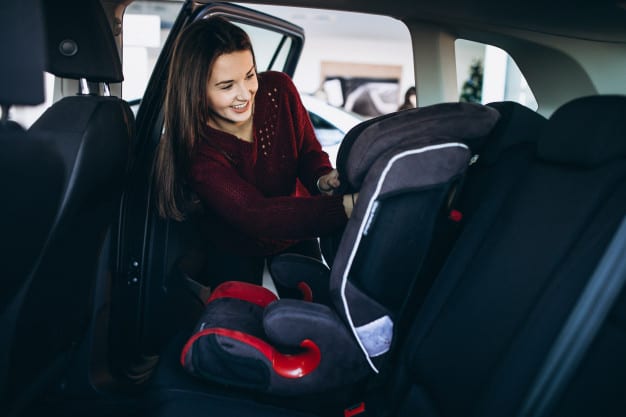
Booster Seat Installation
Many booster seats do not come equipped with a LATCH system. This is because unlike infant car seats installation boosters don’t have to have a super tight install. Instead, booster seats rely on your child’s weight and the lap-shoulder seat belt to hold them in place. When trying to figure out how to install booster seat be sure to refer to your seat’s manual as booster seat models can vary.
A highback booster is a booster seat equipped with upper back guides and a headrest. Occasionally, these boosters can include a five-point harness. However, many highback boosters only have shoulder belt guides that help to position the seat belt properly across your child’s chest.
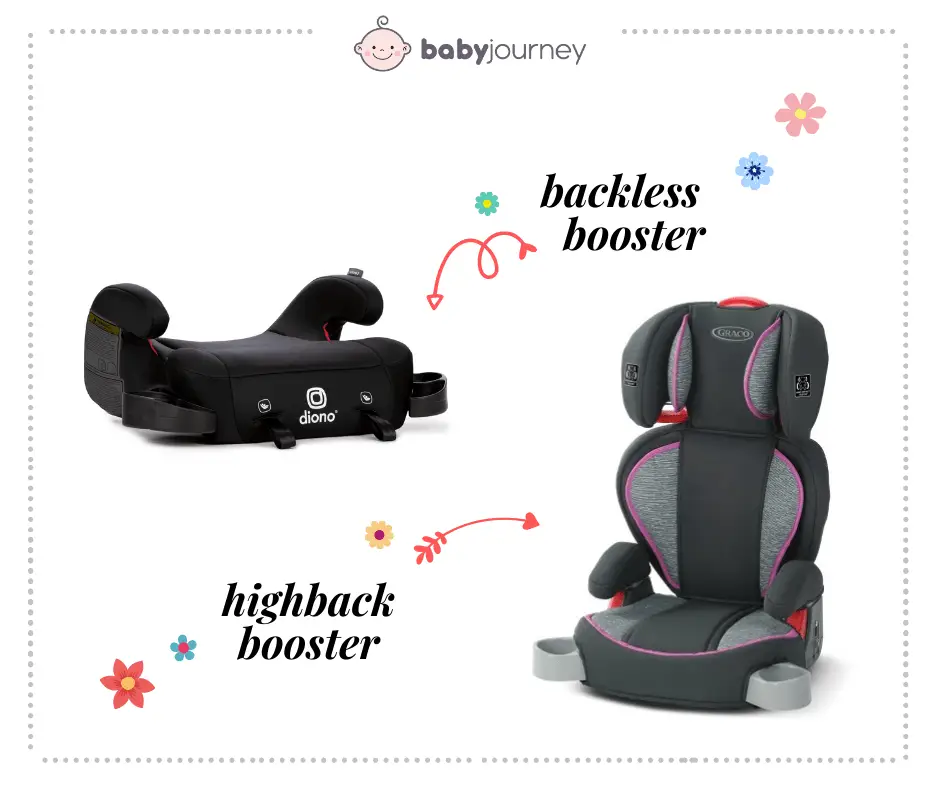
Traditional booster seats, also known as backless boosters, consist of only a booster base that helps to position the lap portion of your vehicle’s seat belt. They are made to lift your child up to the proper height for your vehicle’s seat belt to work effectively.
Both styles of these belt-positioning seats should be installed forward facing in the rear seat of your car.
Highback Booster Installation
Steps:
- Check your car seat installation manual, some boosters are equipped with LATCH. If your booster seat uses LATCH, follow your manual’s instructions. An example of a highback booster installation can be found in this video.
- To secure the booster seat using the seatbelt place the booster in your vehicle’s back seat
- Have your child sit in the seat
- Pull the seat belt through the belt guides (upper and lower for high back boosters) and buckle the belt
- Make sure the belt lies snug across your child’s upper thighs/hips and on their chest between their shoulder and collar bone
Backless Booster Seat Installation
Steps:
- Place the booster in your vehicle’s back seat
- Have your child sit in the seat
- Pull the seat belt across their chest and through the lower belt guide then buckle the belt
- Make sure the belt lies snug across your child’s upper thighs/hips and on their chest between their shoulder and collar bone
What to do After Car Seat Installation
After you install your car seat you should check the security of the install. The seat should not move from side to side more than one inch in either direction. Check the recline of the seat as well using the bubble level indicator.
If necessary, adjust the harness and headrest to properly fit your child. After any type of child safety seat installation refer to your manual and double check the procedure. It is beneficial to check the fit and security of your seat often.
Tips & Tricks
- When installing car seats move the front seats up as far as you can. This way you will have lots of room to work.
- When tightening your install using either the LATCH straps or the seatbelt, put your full weight onto the car seat. Do not use just your hand to press down on the seat but if possible bend your leg and place your knee into the seat near the crotch buckle, pressing all of your weight down onto the seat.
- Shift your weight left to right and back towards the vehicle seat as you pull the belts tight
- For convertible rear-facing seats, you can stand between the car seat and the vehicle seat and press your stomach into the seat in order to pull the straps tight
- It is always a great idea to have a certified car seat installation technician inspect your car seat installation. You can find a technician in your area here.
- Installing your car seat is only half of car seat safety. Be sure to properly fit your seat to your child. Keeping them rear facing as long as possible and adjusting the recline, headrest, and harness position as necessary.
FAQs:
What is the best or safest place to install a car seat?
Generally, the safest place to install a car seat is the center of your vehicle’s back seat. Sometimes, the LATCH anchors are not in the correct position for a center seat install. In that case, you should install your car seat in whichever space you can achieve the most secure installation (as long as it is in the back seat).
Is it safe to install a car seat without the base?
Infant car seats can sometimes be installed without their base, though using the base is safest. Make sure your seat can be installed without the base before attempting to do so.
How do you install an infant car seat without the base?
To install an infant seat without the base you must use the seat belt. Make sure your seatbelt is in the locked position. Route it through the guided belt path following your car seat user manual. Buckle the belt and remove the slack, tightening the seat down. Check that the recline angle is appropriate and that your seat does not move too much side to side.
Should the car seat go behind the driver or passenger?
The middle of the back seat is the safest position. If you are not able to secure your child in the center, behind the passenger is the next safest.
Can you put two car seats next to each other?
You can place two car seats next to each other as long as you are able to obtain a secure install with each seat. The safest place to install two car seats is the center of the back seat and behind the passenger in the back seat.
Is LATCH or seat belt safer when installing a car seat?
It is generally thought that LATCH and seat belt installations are equally safe.
Final Thoughts
The most important thing when installing your car seat is achieving a secure install. Be sure to follow all the instructions in your specific car seat manual. Once you have installed the seat recheck for security, recline angle, and proper positioning. It never hurts to have a technician inspect your install providing you peace of mind and giving your child the safest ride.
—